

常用模版#
一、Docker#
0. Docker 配置文件#
示例:#
cat > /etc/docker/daemon.json <<EOF
{
  "exec-opts": ["native.cgroupdriver=systemd"],
  "log-driver": "json-file",
  "log-opts": {
    "max-size": "100m",
    "max-file": "100"
  },
  "insecure-registries": ["harbor.yuliu.com"],
  "registry-mirrors": [
        "https://docker.mirrors.ustc.edu.cn",
        "https://registry.docker-cn.com",
        "https://mirror.gcr.io",
        "https://docker.registry.cyou",
        "https://docker-cf.registry.cyou",
        "https://dockercf.jsdelivr.fyi",
        "https://docker.jsdelivr.fyi",
        "https://dockertest.jsdelivr.fyi",
        "https://mirror.aliyuncs.com",
        "https://dockerproxy.com",
        "https://mirror.baidubce.com",
        "https://docker.m.daocloud.io",
        "https://docker.nju.edu.cn",
        "https://docker.mirrors.sjtug.sjtu.edu.cn",
        "https://docker.m.daocloud.io",
        "https://huecker.io",
        "https://dockerhub.timeweb.cloud",
        "https://noohub.ru",
        "https://ustc-edu-cn.mirror.aliyuncs.com",
        "https://hub.uuuadc.top",
        "https://docker.anyhub.us.kg",
        "https://dockerhub.jobcher.com",
        "https://dockerhub.icu",
        "https://docker.ckyl.me",
        "https://docker.awsl9527.cn",
        "https://x9r52uz5.mirror.aliyuncs.com",
        "https://docker.chenby.cn",
        "https://docker.1panel.live",
        "https://docker.awsl9527.cn",
        "https://dhub.kubesre.xyz"
       ]
}
EOF
1. 容器启动命令#
参考链接CSDN
# 命令格式
docker run [OPTIONS] IMAGE [COMMAND] [ARG...]
- IMAGE: 使用的镜像
- COMMAND: 在容器中运行的命令
- ARG...: 传递给命令的参数
# 命令选项
-d: 在后台运行容器并打印容器ID
-p: 发布容器的端口到主机
-v: 绑定一个卷
-e: 设置环境变量
-h: 容器的主机名
--rm: 容器退出时自动删除
--restart: 容器退出时的重启策略
--name: 为容器指定一个名称
--expose: 暴露一个端口或一组端口
--network: 连接到网络
--ip: 为容器指定IP地址
--dns: 设置自定义DNS服务器
--entrypoint: 覆盖默认的ENTRYPOINT
--user, -u: 指定运行用户
--workdir, -w: 工作目录
--add-host: 添加自定义主机到/etc/hosts
--read-only: 将容器文件系统设置为只读
--security-opt: 安全选项
--privileged: 给予扩展的权限
--device: 添加主机设备给容器
--tmpfs: 挂载一个tmpfs目录
--stop-signal: 设置停止容器的信号
--stop-timeout: 容器停止超时时间
--health-cmd: 健康检查命令
--health-interval: 健康检查间隔
--health-retries: 健康检查重试次数
--health-timeout: 健康检查超时时间
--health-start-period: 应用健康检查前的初始延迟
(1)启动容器并挂载相关目录#
docker run -d \
  --name my-app \
  -p 8080:80 \
  --restart unless-stopped \
  --memory=512m \
  --cpus=1 \
  --log-opt max-size=10m \
  --log-opt max-file=3 \
  nginx
可替代参数:
1. restart
no:不重启(默认)
always:一直重启
unless-stoped:除去手动退出,一直重启
on-failure[:max]:由于错误退出时,重启(可以设置大些,防止因机器重启造成无法拉起)
(2)启动容器并挂载GPU#
- 挂载全部GPU
docker run --shm-size 4g -itd \
--name ocr \
-p 8502:8502 \
-p 8506:8506 \
-p 8507:8507 \
-v /home/s1/exchange_file:/home/serving/exchange_file \
-v /etc/localtime:/etc/localtime:ro \
-e LD_LIBRARY_PATH=/nvidia:$LD_LIBRARY_PATH \
--gpus all \
--restart always \
image_name \
--token=192.168.1.15 \
--entrypoint /opt/sae/bin/entrypoint.sh

## -e LD_LIBRARY_PATH=/nvidia:$LD_LIBRARY_PATH   挂载cuda相关的库文件
- 挂载部分GPU
docker run -it \
  --gpus '"device=5,6,7"' \
  --name my_tf_container \
  -v /data:/data \
  my_tensorflow_image
- 挂载GPU
docker run --rm -it --gpus=all --name ssm-ie_small_model \
--device /dev/nvidia0:/dev/nvidia0 \
--device /dev/nvidiactl:/dev/nvidiactl \
--device /dev/nvidia-uvm:/dev/nvidia-uvm \
--device /dev/nvidia-uvm-tools:/dev/nvidia-uvm-tools \
ie_small_model:v005dev /bin/bash
- 挂载华为310p 国产npu
 docker run  --name ${container_name} ${DEV_MOUNT} \
 --device=/dev/davinci0 \
 --device=/dev/davinci_manager \
 --device=/dev/devmm_svm \
 --device=/dev/hisi_hdc  \
 -v /home/serving/exchange_file:/home/serving/exchange_file \
 -v /usr/local/bin/npu-smi:/usr/local/bin/npu-smi \
 -v /etc/ascend_install.info:/etc/ascend_install.info \
 -v /usr/local/Ascend/driver:/usr/local/Ascend/driver \
 -p 8506:8506  \
 -p 8507:8507  -itd \
 --shm-size 32G \
 --restart=always  \
 --entrypoint /bin/bash  \
 $DOCKER_IMAGE \
 /opt/sae/bin/entrypoint.sh \
 --token=192.168.106.7 \
(3)启动容器并配置日志轮转#
docker run \
  --name my_app_container \
  --log-opt max-size=10m \
  --log-opt max-file=3 \
  --memory="2g" \
  --cpus=".5" \
  --label env=production \
  -p 8080:80 \
  -v /path/to/host/data:/path/to/container/data \
  -d \
  --restart unless-stopped \
  my_app_image:latest
2. Docker-compose模版#
2.1 字段模版#
# 指定 Docker Compose 文件版本(推荐 3.x)
version: '3.8'

# 定义服务集合
services:
  # 示例服务:Web 应用
  webapp:
    # 指定服务使用的镜像(优先从仓库拉取)
    image: nginx:latest

    # 构建镜像的配置(若需自定义构建)
    build:
      # Dockerfile 所在目录路径
      context: ./app
      # 指定 Dockerfile 文件名
      dockerfile: Dockerfile.prod
      # 构建参数(覆盖 Dockerfile 中的 ARG)
      args:
        APP_ENV: production

    # 自定义容器名称(避免自动生成)
    container_name: my_webapp

    # 端口映射(宿主机端口:容器端口)
    ports:
      - "80:80"
      - "443:443"

    # 数据卷挂载(宿主机路径:容器路径:读写模式)
    volumes:
      - ./app/data:/var/www/html:rw  # 读写模式
      - nginx_config:/etc/nginx/conf.d:ro  # 只读模式

    # 环境变量配置(支持键值对或列表)
    environment:
      TZ: Asia/Shanghai
      DEBUG: "false"
      - DB_HOST=db

    # 从文件加载环境变量
    env_file:
      - .env.production

    # 依赖服务(确保依赖服务先启动)
    depends_on:
      - db
      - redis

    # 容器重启策略
    restart: unless-stopped

    # 自定义 DNS 解析(域名:IP)
    extra_hosts:
      - "api.example.com:192.168.1.100"
      - "gateway.internal:172.18.0.1"

    # 容器权限配置
    privileged: true  # 开启特权模式
    user: root        # 指定运行用户
    cap_add:          # 添加 Linux 能力
      - NET_ADMIN

    # 健康检查配置
    healthcheck:
      test: ["CMD", "curl", "-f", "http://localhost"]
      interval: 30s
      timeout: 10s
      retries: 3

    # 日志配置
    logging:
      driver: json-file
      options:
        max-size: "10m"
        max-file: "3"

    # 网络配置
    networks:
      - frontend
      - backend

  # 示例服务:数据库
  db:
    image: postgres:13
    container_name: app_db
    volumes:
      - pg_data:/var/lib/postgresql/data
    environment:
      POSTGRES_PASSWORD: secret
    networks:
      - backend

  # 示例服务:Redis
  redis:
    image: redis:alpine
    command: redis-server --requirepass secret
    networks:
      - backend

# 自定义网络配置
networks:
  frontend:
    driver: bridge
    ipam:
      config:
        - subnet: 172.20.0.0/24
  backend:
    driver: bridge

# 数据卷声明(持久化存储)
volumes:
  nginx_config:
  pg_data:
2.2 ip自动改变模版#
在 Docker Compose 中,extra_hosts 字段默认需手动指定静态 IP,无法直接自动识别动态变化的主机 IP。以下是几种自动化适配动态 IP 的解决方案,按推荐度排序:
方案一:使用 host.docker.internal 特殊域名(推荐🔥)
原理:Docker 内置域名 host.docker.internal 自动解析为宿主机的 IP,无需手动配置。
配置方法:
services:
  webapp:
    extra_hosts:
      - "myhost:host.docker.internal"   # 自动指向宿主机
优点:
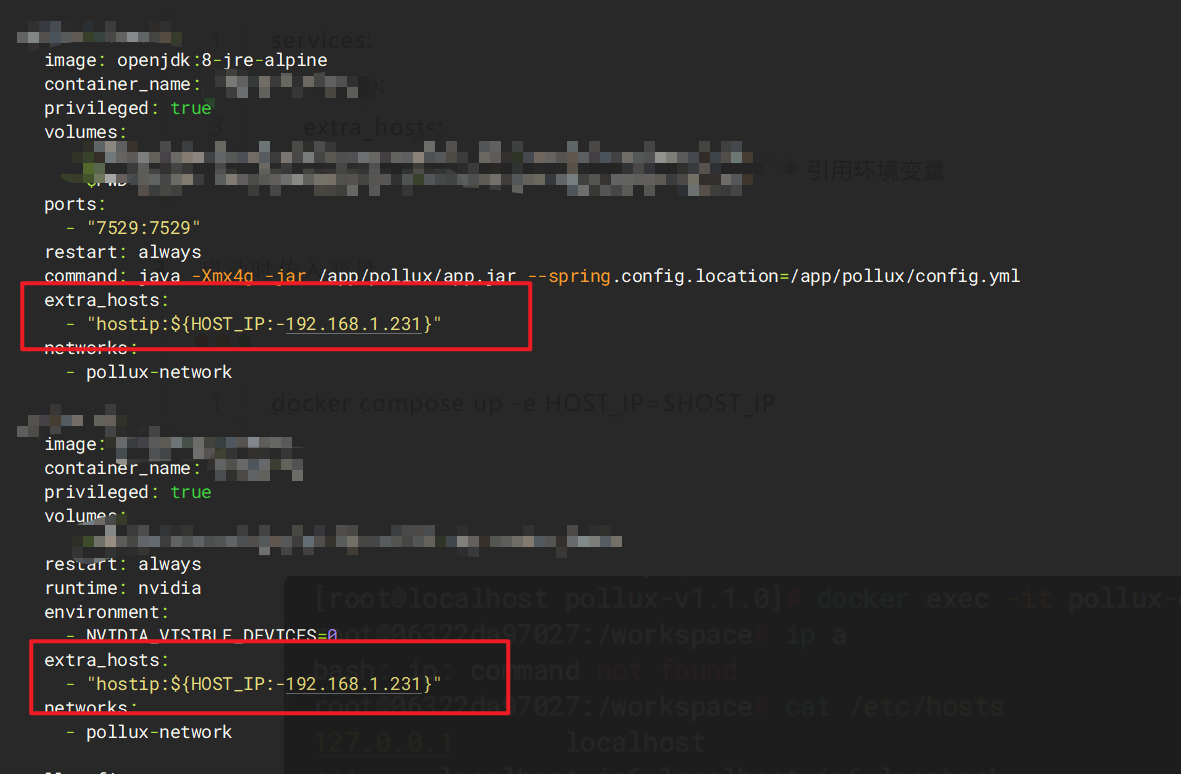
方案二:通过环境变量动态注入 IP
原理:在启动容器时传入宿主机 IP 的环境变量,并在 extra_hosts 中引用该变量。
步骤:
获取宿主机 IP
(以 Linux 为例):
# 获取宿主机当前 IP(例如 eth0 网卡)
export HOST_IP=$(ip addr show eth0 | grep "inet " | awk '{print $2}' | cut -d/ -f1)

# 动态获取默认网卡的ip并设置为环境变量
echo "HOST_IP=$(ip -4 addr show dev "$(ip route | grep default | awk '{print $5}'|head -n 1)" | grep -oP '(?<=inet\s)\d+(\.\d+){3}')" >> ~/.bashrc
source ~/.bashrc
修改
docker-compose.ymlservices: webapp: extra_hosts: - "myhost:${HOST_IP:-192.168.1.100}" # 引用环境变量启动时传入变量
docker compose up -e HOST_IP=$HOST_IP
优点:
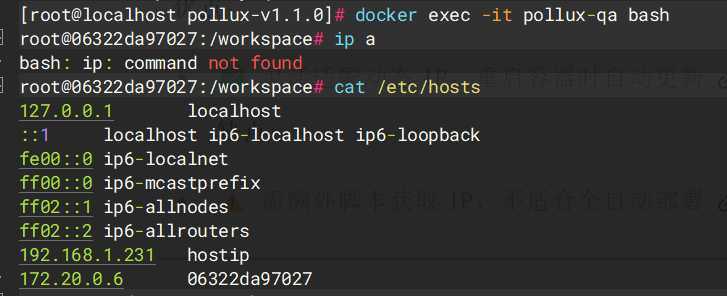
方案三:启动脚本动态更新 hosts(复杂场景)
原理:在容器启动时通过脚本获取宿主机 IP 并写入 /etc/hosts。
配置方法:
创建启动脚本
entrypoint.sh:#!/bin/sh HOST_IP=$(ip route show default | awk '{print $3}') # 获取宿主机网关 IP echo "$HOST_IP myhost" >> /etc/hosts # 追加到 hosts exec "$@" # 执行原始启动命令修改 Dockerfile
COPY entrypoint.sh  /entrypoint.sh
RUN chmod +x /entrypoint.sh
ENTRYPOINT ["/entrypoint.sh"]
在
docker-compose.yml中移除extra_hosts配置。 优点:
方案四:改用 network_mode: host(慎用❗)
原理:容器共享宿主机网络命名空间,直接通过 localhost 访问宿主机服务。
配置:
services:
  webapp:
    network_mode: host  # 与宿主机共用网络
    # 无需 extra_hosts,直接用 localhost 访问宿主机
优点:
各方案适用场景总结
| 方案 | 适用场景 | 自动化程度 | 复杂度 |
|---|---|---|---|
host.docker.internal | 快速开发、测试环境 | ★★★★★ | 低 |
| 环境变量动态注入 | CI/CD 流水线、动态 IP 环境 | ★★★★☆ | 中 |
| 启动脚本更新 hosts | 无 Docker 内置域名支持的老版本 | ★★★☆☆ | 高 |
network_mode: host | 高性能需求且不要求网络隔离 | ★★★★★ | 低 |
2.3 前端托管模版#
version: '3'
services:
  nginx:
    image: nginx:1.25.3
    container_name: frontend-sjfxwj
    ports:
      - "55219:80"
    volumes:
      - ./dist:/usr/share/nginx/html
      - ./nginx.conf:/etc/nginx/conf.d/default.conf
3. Dockerfile模版#
(1)前端模版#
**说明:**node编译,托管到nginx
# 使用 Node.js 作为构建环境
FROM node:16 AS build
# 设置工作目录
WORKDIR /app
# 复制 package.json 和 package-lock.json
COPY package*.json ./
# 安装依赖
RUN npm install
# 复制其他源代码
COPY . .
# 构建前端应用
RUN npm run build
# 使用 Nginx 作为生产环境的服务器
FROM nginx:alpine
# 删除默认的 Nginx 网站内容
RUN rm -rf /usr/share/nginx/html/*
# 从构建的镜像中复制构建好的文件到 Nginx 目录
COPY --from=build /app/dist /usr/share/nginx/html
# 暴露 Nginx 默认的端口
EXPOSE 80
# 启动 Nginx
CMD ["nginx", "-g", "daemon off;"]
**说明:**前后端做编译,放入后端镜像中做托管
# 无缓冲镜像,会比较耗费时间
FROM node:10.15-alpine as front-builder
WORKDIR /user
ADD ./frontend/application .
RUN yarn                        #  这一步耗费的时间最长
RUN yarn build

FROM golang:1.12.5-alpine3.9 as back-builder
WORKDIR /go
RUN mkdir -p ./src/xxx
ADD ./backend/src/xxx ./src/xxx
RUN go install xxx

FROM golang:1.12.5-alpine3.9
WORKDIR /app
COPY --from=front-builder /user/build ./public
COPY --from=back-builder /go/bin/xxx .

CMD ["./xxx"]

#制作缓冲镜像
FROM node:10.15-alpine
WORKDIR /user
ADD ./frontend/application .
RUN yarn
RUN rm -rf `grep -v "node_modules" | grep -v "yarn.lock"`

#利用缓冲镜像,进行构建
FROM node-application-cache:latest as front-builder  #更换了前端构建镜像
WORKDIR /user
ADD ./frontend/application .
RUN yarn                        #  这一步耗费的时间最长
RUN yarn build

FROM golang:1.12.5-alpine3.9 as back-builder
WORKDIR /go
RUN mkdir -p ./src/xxx
ADD ./backend/src/xxx ./src/xxx
RUN go install xxx

FROM golang:1.12.5-alpine3.9
WORKDIR /app
COPY --from=front-builder /user/build ./public
COPY --from=back-builder /go/bin/xxx .

CMD ["./xxx"]
(2)后端模版#
- Python
# 使用 Python 作为基础镜像
FROM python:3.9
# 设置工作目录
WORKDIR /usr/src/app
# 复制 requirements.txt
COPY requirements.txt ./
# 安装依赖
RUN pip install --no-cache-dir -r requirements.txt
# 复制应用源代码
COPY . .
# 暴露服务运行的端口
EXPOSE 5000
# 设置环境变量
ENV FLASK_APP=app.py
# 启动 Flask 应用
CMD ["flask", "run", "--host=0.0.0.0"]
FROM python:3.10.12-slim
LABEL \
    author="hwz" \
    email="17691281867@163.com"
WORKDIR /app
RUN ln -sf /usr/share/zoneinfo/Asia/Shanghai  /etc/localtime
RUN echo "deb https://mirrors.tuna.tsinghua.edu.cn/debian/ bookworm main contrib non-free non-free-firmware" > /etc/apt/sources.list \
    #&& echo "deb-src https://mirrors.tuna.tsinghua.edu.cn/debian/ bookworm main contrib non-free non-free-firmware" >> /etc/apt/sources.list \
    && echo "deb https://mirrors.tuna.tsinghua.edu.cn/debian/ bookworm-updates main contrib non-free non-free-firmware" >> /etc/apt/sources.list \
    #&& echo "deb-src https://mirrors.tuna.tsinghua.edu.cn/debian/ bookworm-updates main contrib non-free non-free-firmware" >> /etc/apt/sources.list \
    && echo "deb https://mirrors.tuna.tsinghua.edu.cn/debian/ bookworm-backports main contrib non-free non-free-firmware" >> /etc/apt/sources.list \
    #&& echo "deb-src https://mirrors.tuna.tsinghua.edu.cn/debian/ bookworm-backports main contrib non-free non-free-firmware" >> /etc/apt/sources.list
    && echo "deb https://mirrors.tuna.tsinghua.edu.cn/debian-security bookworm-security main contrib non-free non-free-firmware" >> /etc/apt/sources.list
    # && echo "deb-src https://mirrors.tuna.tsinghua.edu.cn/debian-security bookworm-security main contrib non-free non-free-firmware" >> /etc/apt/sources.list

RUN apt update
RUN apt install -y dmidecode
Run apt install -y vim ping wget curl
RUN apt-get install -y libreoffice

# Install python requirements.txt
ADD requirements.txt .
RUN pip config set global.index-url https://pypi.tuna.tsinghua.edu.cn/simple
RUN pip config set global.trusted-host pypi.tuna.tsinghua.edu.cn
RUN pip install -i https://pypi.tuna.tsinghua.edu.cn/simple -r requirements.txt  && pip cache purge
ADD .  /app
EXPOSE 37861
CMD ["python", "application.py"]
#cudnn、python3.10、cuda:12.6.1
FROM nvidia/cuda:12.6.1-cudnn-devel-ubuntu20.04_python3.10
LABEL  author="hwz"
SHELL  ["/bin/bash", "-c"]
RUN apt-get update && apt install wget curl vim -y
WORKDIR /app
RUN ln -sf /usr/share/zoneinfo/Asia/Shanghai /etc/localtime
## 安装pip包
RUN  pip3  config set global.index-url https://pypi.tuna.tsinghua.edu.cn/simple
ADD ./requirements_yyb.txt .
RUN  pip3 install -r requirements_yyb.txt && pip3 cache purge
ADD . /home/xchat-model-service
WORKDIR /home/xchat-model-service
ADD . .
EXPOSE 38866
CMD ["python3", "application.py"]
FROM python:3.10.12-slim
LABEL \
    author="Cao Hong Wei" \
    email="SpringChw@outlook.com"
WORKDIR /app
RUN ln -sf /usr/share/zoneinfo/Asia/Shanghai  /etc/localtime
RUN echo "deb https://mirrors.tuna.tsinghua.edu.cn/debian/ bookworm main contrib non-free non-free-firmware" > /etc/apt/sources.list \
    #&& echo "deb-src https://mirrors.tuna.tsinghua.edu.cn/debian/ bookworm main contrib non-free non-free-firmware" >> /etc/apt/sources.list \
    && echo "deb https://mirrors.tuna.tsinghua.edu.cn/debian/ bookworm-updates main contrib non-free non-free-firmware" >> /etc/apt/sources.list \
    #&& echo "deb-src https://mirrors.tuna.tsinghua.edu.cn/debian/ bookworm-updates main contrib non-free non-free-firmware" >> /etc/apt/sources.list \
    && echo "deb https://mirrors.tuna.tsinghua.edu.cn/debian/ bookworm-backports main contrib non-free non-free-firmware" >> /etc/apt/sources.list \
    #&& echo "deb-src https://mirrors.tuna.tsinghua.edu.cn/debian/ bookworm-backports main contrib non-free non-free-firmware" >> /etc/apt/sources.list
    && echo "deb https://mirrors.tuna.tsinghua.edu.cn/debian-security bookworm-security main contrib non-free non-free-firmware" >> /etc/apt/sources.list
    # && echo "deb-src https://mirrors.tuna.tsinghua.edu.cn/debian-security bookworm-security main contrib non-free non-free-firmware" >> /etc/apt/sources.list

RUN apt update
RUN apt install dmidecode
RUN apt-get install -y libreoffice

# Install python requirements.txt
ADD requirements.txt .
RUN pip install -i https://pypi.tuna.tsinghua.edu.cn/simple -r requirements.txt  && pip cache purge

#FROM xchat-backend-base-image:1.3
#LABEL  author="hwz"
ADD .  /home/xchat-model-service
WORKDIR /home/xchat-model-service
RUN pip install pymysql
RUN pip install minio
Run pip install tiktoken
ADD  .  .
EXPOSE 37861
CMD ["/opt/conda/bin/python", "application.py"]
FROM python:3.10.12-slim
LABEL \
    author="hwz" \
    email="17691281867@163.com"
WORKDIR /app
RUN ln -sf /usr/share/zoneinfo/Asia/Shanghai  /etc/localtime
RUN echo "deb https://mirrors.tuna.tsinghua.edu.cn/debian/ bookworm main contrib non-free non-free-firmware" > /etc/apt/sources.list \
    && echo "deb https://mirrors.tuna.tsinghua.edu.cn/debian/ bookworm-updates main contrib non-free non-free-firmware" >> /etc/apt/sources.list \
    && echo "deb https://mirrors.tuna.tsinghua.edu.cn/debian/ bookworm-backports main contrib non-free non-free-firmware" >> /etc/apt/sources.list \
    && echo "deb https://mirrors.tuna.tsinghua.edu.cn/debian-security bookworm-security main contrib non-free non-free-firmware" >> /etc/apt/sources.list

# 清理 apt 缓存
RUN echo "Asia/Shanghai" > /etc/timezone && \
    ln -sf /usr/share/zoneinfo/Asia/Shanghai /etc/localtime && \
    dpkg-reconfigure -f noninteractive tzdata
RUN apt clean && rm -rf /var/lib/apt/lists/*

# 更新软件包列表
RUN apt update

RUN apt install -y dmidecode
RUN apt install -y vim iputils-ping  wget curl
RUN apt-get install -y libreoffice

# Install python requirements.txt
ADD requirements.txt .
RUN pip install -i https://pypi.tuna.tsinghua.edu.cn/simple -r requirements.txt  && pip cache purge
ADD .  /app
EXPOSE 17000
CMD ["python", "main.py"]
### 阻塞进程
FROM pollux_finetune_deploy_npu:v0.9.3_4.51.3
COPY finetune/preset_config /workspace/preset_config
COPY utils.py   /workspace/utils.py
COPY npu_utils.py  /workspace/npu_utils.py
CMD ["bash", "-c",  "python /workspace/main_server.py>/workspace/app.log 2>&1 & tail -f /workspace/app.log & wait"]
- Java (Spring Boot)
# 使用 Maven 构建应用
FROM maven:3.8.1-openjdk-16 AS build
# 设置工作目录
WORKDIR /usr/src/app
# 复制 pom.xml 和代码
COPY pom.xml ./
COPY src ./src
# 构建应用
RUN mvn clean package -DskipTests
# 使用 OpenJDK 作为运行时环境
FROM openjdk:16-jdk-alpine
# 复制 jar 文件到新镜像中
COPY --from=build /usr/src/app/target/myapp.jar myapp.jar
# 暴露服务运行的端口
EXPOSE 8080
# 启动 Spring Boot 应用
CMD ["java", "-jar", "myapp.jar"]
FROM python:3.10.12-slim
LABEL  author="hwz"
SHELL  ["/bin/bash", "-c"]
RUN ln -sf /usr/share/zoneinfo/Asia/Shanghai  /etc/localtime
RUN echo "deb https://mirrors.tuna.tsinghua.edu.cn/debian/ bookworm main contrib non-free non-free-firmware" > /etc/apt/sources.list \
    #&& echo "deb-src https://mirrors.tuna.tsinghua.edu.cn/debian/ bookworm main contrib non-free non-free-firmware" >> /etc/apt/sources.list \
    && echo "deb https://mirrors.tuna.tsinghua.edu.cn/debian/ bookworm-updates main contrib non-free non-free-firmware" >> /etc/apt/sources.list \
    #&& echo "deb-src https://mirrors.tuna.tsinghua.edu.cn/debian/ bookworm-updates main contrib non-free non-free-firmware" >> /etc/apt/sources.list \
    && echo "deb https://mirrors.tuna.tsinghua.edu.cn/debian/ bookworm-backports main contrib non-free non-free-firmware" >> /etc/apt/sources.list \
    #&& echo "deb-src https://mirrors.tuna.tsinghua.edu.cn/debian/ bookworm-backports main contrib non-free non-free-firmware" >> /etc/apt/sources.list
    && echo "deb https://mirrors.tuna.tsinghua.edu.cn/debian-security bookworm-security main contrib non-free non-free-firmware" >> /etc/apt/sources.list
    # && echo "deb-src https://mirrors.tuna.tsinghua.edu.cn/debian-security bookworm-security main contrib non-free non-free-firmware" >> /etc/apt/sources.list
RUN apt-get update && apt install wget curl vim -y
WORKDIR /app
COPY requirements.txt ./
RUN pip install -i https://pypi.tuna.tsinghua.edu.cn/simple -r requirements.txt  && pip cache purge
COPY . .
EXPOSE 17000
ENV FLASK_APP=app.py
CMD ["/opt/conda/bin/python", "application.py"]
#CMD ["python", "application.py"]
- Go 应用
# 使用 Golang 作为基础镜像
FROM golang:1.17 AS builder
# 设置工作目录
WORKDIR /app
# 复制 go.mod 和 go.sum
COPY go.mod ./
COPY go.sum ./
# 下载依赖
RUN go mod download
# 复制源代码
COPY . .
# 构建 Go 应用
RUN CGO_ENABLED=0 GOOS=linux go build -o myapp .
# 使用 Alpine 作为轻量级运行环境
FROM alpine:latest
# 设置工作目录
WORKDIR /root/
# 复制编译好的二进制文件到新镜像
COPY --from=builder /app/myapp .
# 暴露服务运行的端口
EXPOSE 8080
# 启动应用
CMD ["./myapp"]
(3)镜像封装python环境#
FROM nvidia/cuda:12.6.1-cudnn-devel-ubuntu20.04
ENV DEBIAN_FRONTEND=noninteractive \
    TZ=Asia/Shanghai
RUN apt-get update && \
    apt-get install -y --no-install-recommends \
        software-properties-common \
        wget \
        git \
        build-essential \
        libssl-dev \
        zlib1g-dev \
        libffi-dev && \
    add-apt-repository -y ppa:deadsnakes/ppa && \
    apt-get install -y python3.10 python3.10-dev python3.10-venv && \
    update-alternatives --install /usr/bin/python3 python3 /usr/bin/python3.10 1 && \
    rm -rf /var/lib/apt/lists/*

RUN wget https://bootstrap.pypa.io/get-pip.py  && \
    python3.10 get-pip.py  && \
    rm get-pip.py  && \
    pip install --upgrade pip

RUN pip cache purge


